Stop tagging images by hand AI Image Tagger sends your images to a vision language model and writes the tags back to Eagle automatically. Works with OpenAI, Anthropic, or any local OpenAI-compatible server — LM Studio, Ollama, or similar. Use existing API access or run a free local model and keep everything on-device.
Library matching The LLM first generates tags freely from the image, then a second text-only call matches those against your existing Eagle tag library. Relevant tags you've already used get surfaced alongside new ones — keeping your taxonomy consistent without extra steps. A local string-matching pre-filter keeps the prompt small even for large libraries.
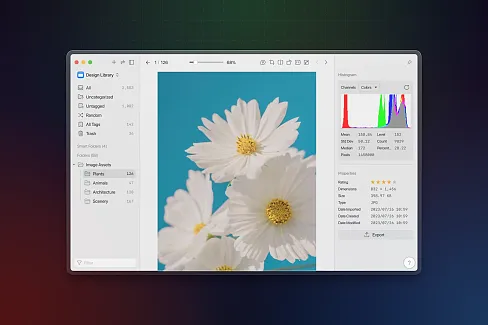
Gallery view Browse your entire image library inside the plugin. Filter by filename, tag status, include or exclude specific tags, and sort by name or tag count. Pin any filter to the top bar for quick access. Select images with click, Shift+click range selection, or per-card checkboxes. Batch-tag a selection or everything currently visible.
Tag blacklist Globally exclude tags from all results — they'll never be shown or saved regardless of what the model generates.
Prompt presets Save and switch between named prompts for different content types. The default generates Danbooru-style tags covering subject, style, pose, lighting, colors, and background.
Auto-save & deduplication Enable auto-save to write tags immediately after generation. Tags already on an item are never re-added.
Usage:
Single image Open the plugin while images are selected in Eagle. The plugin opens in detail view showing the image, generated tags, and any library suggestions. Click tag chips to add or remove them, then click Save Tags. To add a tag not in your library, click + next to Generated Tags, type the name, and press Enter.
Gallery Click Gallery in the sidebar to browse all library images.
- Filter: click Filters to open the filter panel. Search by filename, filter by tagged/untagged status, include or exclude tags (type and press Enter or use the picker), toggle AND/OR for include logic, and sort by name or tag count. Pin any control to the top bar for quick access. Click Clear all to reset everything.
- Select: click a card to open it in detail view. Click the checkbox on hover, hold Ctrl/Cmd and click, or use Shift+click for range selection. Click Select in the top bar to enter persistent select mode.
- Batch tag: with items selected, click Tag Selected. Click Tag All to process all currently visible (filtered) items. A progress bar shows current/total with a Cancel button.
Tag blacklist In Settings > General, add tags to the blacklist. Blacklisted tags are stripped from all results before they are shown or saved.
Prompt presets In Settings > LLM, use the prompt dropdown to switch between Default and saved presets. Type a custom prompt, click Save as preset... to name and store it. Delete non-default presets with the trash button.
Initial release.
- LLM tagging via OpenAI, Anthropic, and local OpenAI-compatible servers (LM Studio, Ollama)
- Two-pass library tag matching — generates tags freely, then matches against your Eagle library in a separate text call; local pre-filtering keeps prompts small for large libraries
- Gallery view with filters and range selection, and batch tagging with progress and cancel
- Tag blacklist — excludes specified tags from all results
- Prompt presets — save and switch between custom prompts
- Auto-save and tag deduplication
You may also like